
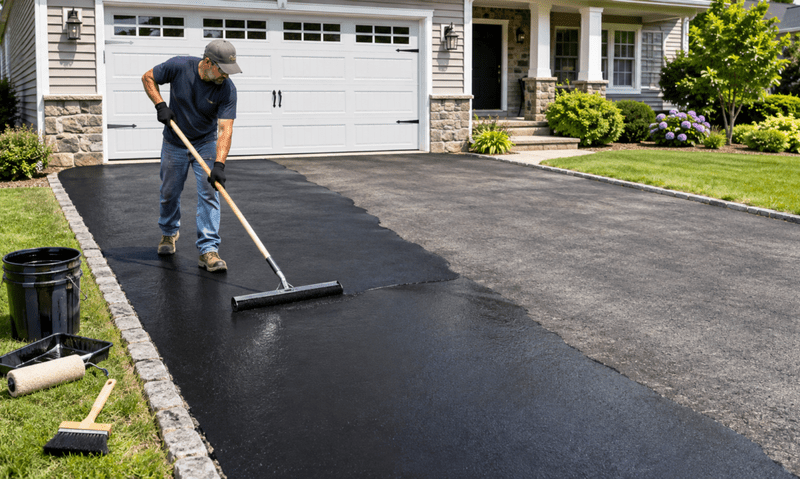
A well-maintained driveway improves your home’s curb appeal, protects your investment, and provides a smooth, durable surface for everyday use. However, constant exposure to sunlight, rain, vehicle traffic, oil spills, and changing temperatures can gradually damage asphalt. Over time, the surface may fade, develop small cracks, and become more vulnerable to water penetration.
DIY driveway sealing is an affordable and practical way to protect your residential asphalt driveway without hiring professional contractors. With the right materials, proper preparation, and a little patience, homeowners can complete this maintenance project themselves. This guide explains everything you need to know about asphalt driveway sealing, from preparation and application to drying and long-term maintenance.
Why Is Driveway Sealing Important?
Asphalt driveways have binding materials that bind the aggregate together and form a strong and flexible surface. Exposure to ultraviolet (UV) rays, moisture, chemicals, and vehicle fluids over time leads to the deterioration of the asphalt binder. This may render the driveway brittle and crack more easily.
The use of asphalt driveway sealer forms a protective coating that minimizes the damages caused by sunlight, water, oil, and daily wear. It also rejuvenates the dark, appealing look of the driveway.
Regular driveway sealing offers several benefits:
- Stops Water Damage: An effective sealer can be used to reduce the amount of moisture that can enter the system and cause damage due to freezing and thawing.
- Prevents UV Rays: Sealcoating delays oxidation due to sun exposure.
- Minimizes Surface Wear: Sealing offers an extra layer of protection against daily traffic and minor spills.
- Prolongs Driveway Life: Routine maintenance will maintain asphalt and can postpone costly repairs or replacement.
Although sealcoating cannot repair major structural problems, it is an effective preventive maintenance solution.
When Should You Seal Your Asphalt Driveway?
Timing plays an important role in achieving good sealing results. Newly installed asphalt generally needs six to twelve months to cure before its first sealcoating application. Always follow the recommendations of your asphalt installer and sealer manufacturer.
In the case of the existing driveways, it is generally advisable to seal the driveway after every two to three years, depending on the weather, traffic and the asphalt conditions.
Select a time when the weather is warm, dry and not turbulent. The majority of asphalt sealers must be applied and cured at a minimum temperature of 50°F, although certain products may have different requirements.
Do not seal during rainy season within the recommended time of drying as recommended by the manufacturer. The sealer may also dry too fast on extremely hot surfaces and this affects the quality of application.
Step-by-Step Guide to DIY Driveway Sealing
Proper preparation is the foundation of successful driveway sealing. Rushing through the process can lead to uneven coverage, peeling, and poor adhesion. Follow these steps to achieve a professional-looking finish.
Step 1: Inspect the Driveway
Begin by surveying the whole asphalt. Check cracks, potholes, loose aggregate, oil spots and water pools.
It is important to remember that driveway sealer is a protective coating, not a substitute to asphalt repairs.
Step 2: Clean the Surface Thoroughly
Clean the dirt, leaves, grass and loose material with a stiff-bristle broom or leaf blower. Be very careful of driveway edges and corners.
Use an appropriate degreaser to remove oil and grease stains. Wipe down difficult spots with a brush and wash as per the instructions on the cleaning product.
When cleaning with water, make sure that the driveway is completely dry before applying sealer. The coating is best applied on a clean and dry surface.
Step 3: Repair Cracks and Damaged Areas
Seal small cracks with an asphalt crack filler that is made to be used on residential driveways. Use as per the instructions of the manufacturer in terms of application and curing time.
In case of bigger cracks, potholes, or widespread surface damage, apply the right asphalt repair material or seek the help of a professional.
Make sure that all repairs are dry before continuing. Using sealer on broken or weakened areas may affect the final outcome.
Step 4: Protect Surrounding Areas
Before opening the sealer container, protect nearby surfaces. Place masking tape or protective sheeting along garage doors, sidewalks, concrete borders, and landscaping.
Remove vehicles, outdoor furniture, and other objects from the driveway. Keep pets and children away from the work area.
Use gloves, safety eyewear, and clothing. In all cases, read the safety instructions of the product beforehand.
Step 5: Apply the Asphalt Driveway Sealer
Stir the sealer thoroughly to achieve a consistent mixture. Avoid adding water or other materials unless the manufacturer specifically recommends it.
Apply a reasonable quantity of sealer to the driveway and evenly distribute it with a long-handled squeegee or applicator of your choice. Work in small areas, keeping the coating thickness constant.
Use the product as per the coverage instructions as set by the manufacturer. Do not form deep puddles or leave gaps.
Step 6: Allow Proper Drying and Curing
Once application is complete, keep vehicles, pedestrians, and pets off the driveway until the sealer has dried sufficiently.
Drying time is also dependent on temperature, humidity, sunshine, and product formulation. Most products take 24-48 hours before vehicle traffic can be permitted, though never ignore the instructions of the manufacturer.
Avoid placing heavy objects on the surface until it has cured properly.
Tools and Materials Needed for Driveway Sealing
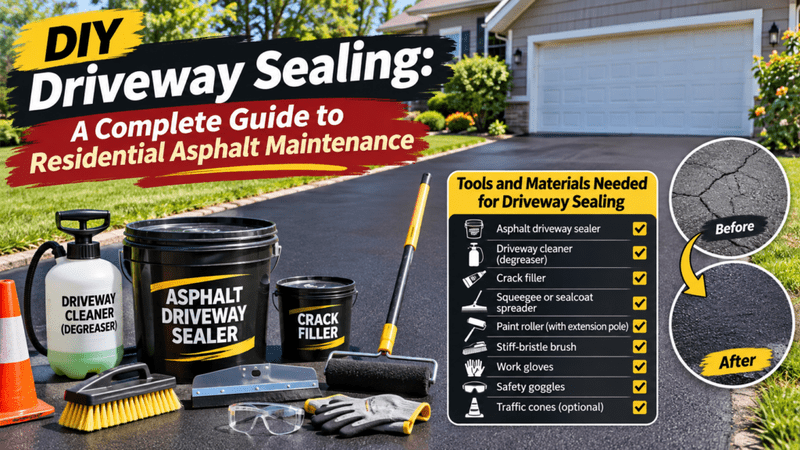
Having the right equipment makes DIY asphalt maintenance easier and more efficient.
Common supplies include:
- Asphalt driveway sealer
- Stiff-bristle broom or leaf blower
- Pressure washer or garden hose
- Asphalt crack filler
- Oil stain cleaner or degreaser
- Squeegee or applicator brush, long-handled
- Safety glasses and protective gloves
- Protective sheeting and masking tape
Measure the length and width of your driveway before buying materials to estimate the total square footage of your driveway. To know the number of containers required, check the coverage rate of the sealer.
Common Driveway Sealing Mistakes to Avoid
Even a straightforward DIY project can produce disappointing results when important steps are overlooked.
One common mistake is applying sealer to a dirty or wet driveway. Dirt and moisture prevent proper adhesion and can cause premature peeling.
Another mistake is applying excessive sealer. Thick coatings may dry unevenly, crack, or develop an unattractive finish. Always follow the recommended application rate.
Homeowners should also avoid sealing newly installed asphalt too early. Fresh asphalt needs sufficient curing time before receiving a protective coating.
Finally, never ignore significant cracks or potholes. Repairing existing damage before sealcoating is essential for long-lasting results.